Add User Panel
The Add User panel is used to add new employees in the XtreamService application. Using this section, permissions can be granted to a employee based on his role at the dealership.

|
To access the Add User panel, click the ADD NEW button on the Search Criteria panel on the User Management screen. |
To add a new employee, access the User Management screen and click the ADD NEW button. Then enter the employee's information in the corresponding fields and click the ![]() (Save) icon. For a procedure on adding a new employee, refer to How to Add a New Employee.
(Save) icon. For a procedure on adding a new employee, refer to How to Add a New Employee.
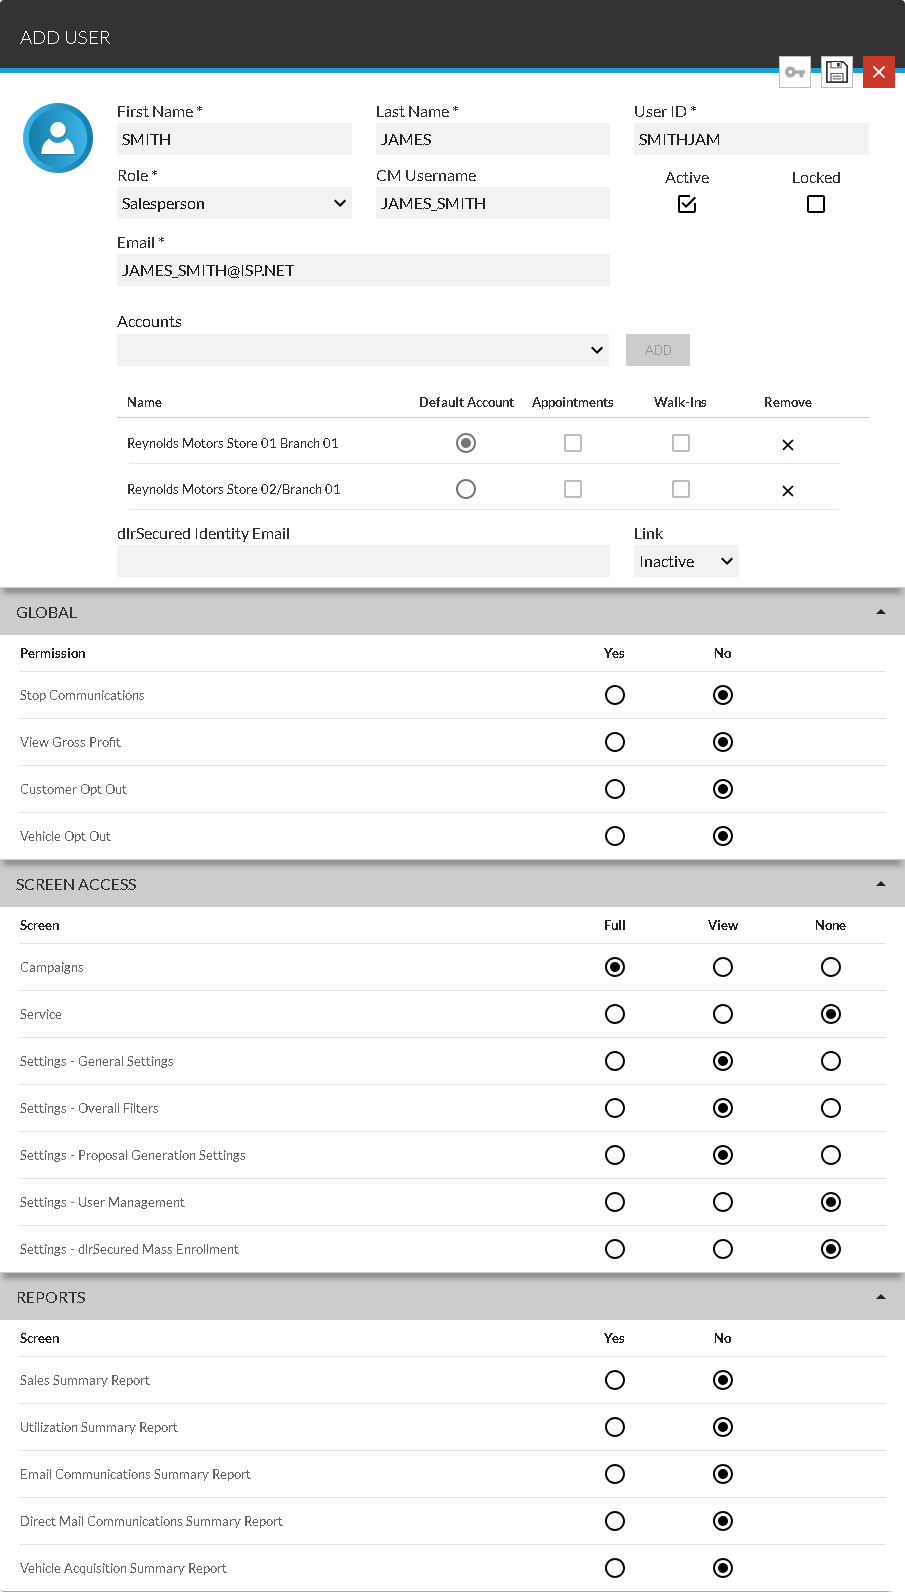
The unlabeled Basic Information section is used to enter general information for the new employee, such as the first and last names, the Email address, and the assigned role. In addition, this section can be used to enroll employees in dlrSecured Identity Management.
Note - For a procedure on enrolling an employee in dlrSecured, refer to How to Enroll an Employee in dlrSecured Identity Management.
The following fields are available in the Basic Information section.
First Name: Enter the first name of the employee.
Last Name: Enter the last name of the employee.
User ID: Enter a User ID for the employee.
Role: Select a role for the employee, such as Salesperson or Service Only.
Note - Permissions for the screens the employee can access and the actions the employee can complete are automatically defined based on the role, but can be changed.
CM Username: Enter the user name for the employee in the Digital Retail Platform.
Note - This field is only available if FOCUS or the Customer application
Active: Select this check box to grant the employee access to the XtreamService application. Clear this check box to inactivate the employee record. Inactive employees cannot sign on to the XtreamService application.
Locked: Select this check box to deny the employee access to the XtreamService application. If this check box is selected, the User ID cannot be used to sign on to the XtreamService application until a new password is generated and this check box is cleared. An employee record is automatically locked after an employee attempts to sign on with the incorrect information five times. For more information on locking employees, refer to How to Lock a User Record.
Email: Enter the Email address of the employee.
Note - This Email address is used when sending Email messages for alert notifications and password resets.
Email Notifications: Enter an additional Email address to which alert notifications should be sent for the employee, and click the ADD button. The Email address displays below the Email Notifications field. To stop sending alert notifications to an Email address, click the ![]() (Remove) icon corresponding to the Email address. The Email address is removed.
(Remove) icon corresponding to the Email address. The Email address is removed.
Note - This field is only available if FOCUS or the Customer application is
Accounts: Select an account and click the ADD button to grant the employee access to the account. The account displays below the Accounts field.
Name: The name of the account displays.
Default Account: Select the option button corresponding to the account to display when
Appointments: Select this check box to
Note - This check box is only available if FOCUS or the Customer application is
Walk-Ins: Select this check box to
Note - This check box is only available if FOCUS or the Customer application is
Remove: Click the ![]() (Remove) icon to remove the employee's access from the corresponding account.
(Remove) icon to remove the employee's access from the corresponding account.
dlrSecured Identity Email: Enter the Email address to link to dlrSecured. This Email address is used by the employee to sign on to the XtreamService application using dlrSecured.
Note - For more information about dlrSecured, refer to dlrSecured Identity Management Overview.
Link: Select whether the employee can sign on to the XtreamService application using dlrSecured. Select Active in this field to require the employee to sign on using dlrSecured. Alternatively, select Inactive to require the employee to use the standard sign on process to access the XtreamService application.
The Global section is used to grant an employee access to view gross profit information in the Lead Sheet panel, in the Sold Matches Gross section, in the Trade-Ins Gross section, and on the Sales Summary screen. In addition, this section is used to grant an employee permission to unsubscribe customers from receiving campaigns.
The following columns display in the Global section.
Permission: The name of the permission displays.
Yes: Select this option button to grant the employee access to view the information or perform the corresponding action.
No: Select this option button to prevent the employee from viewing the information or performing the corresponding action.
The Screen Access section is used to grant an employee access to view and change information on various screens in the XtreamService application.
The following columns display in the Screen Access section.
Screen: The name of the screen displays.
Full: Select this option button to grant the employee access to view and change information on the corresponding screen.
View: Select this option button to grant the employee access to view information on the corresponding screen.
None: Select this option button to prevent the employee from accessing the corresponding screen.
The Reports section is used to grant an employee access to view various reports in the XtreamService application.
The following columns display in the Reports section.
Screen: The name of the report displays.
Yes: Select this option button to grant the employee access to the corresponding report.
No: Select this option button to prevent the employee from accessing the corresponding report.
Click here for a list of products that may be mentioned in this help file.